Installation Chevron T&G
Coswick Chevron flooring is designed for installation in all types of living spaces below, at or above grade.
Planks for laying Chevron are made with a tongue-and-groove connection along the entire perimeter and form mirror pairs of right and left elements. The original packaging contains an equal number of right and left slats.
BEFORE INSTALLATION
Suitable bases for installation
- cement screeds
- calcium sulfate screeds
- moisture resistant plywood
- moisture-resistant chipboard
- plank base
Necessary conditions for installing parquet
The base should be:
- Dry – for screed, absolute humidity is no more than 5%, for wooden floors or plywood, relative humidity is no more than 12%.
- Flat and horizontal – differences in height no more than 2 mm per 2 m, slope up to 0.2% of the corresponding size of the room, but no more than 50 mm.
- Durable – compressive strength of at least 15 MPa.
- Clean – no debris or contaminants that impair adhesion (paint stains, oil, sealants, etc.).
The relative air humidity in the room should be in the range of 40-65% for a three-layer structure and 45-55% for a massive one, the air temperature should be 18-22 °C. At the time of installation of parquet, all “wet” work must be completed, windows and doors must be installed, and ventilation systems must be working.
The parquet must be acclimatized to the installation conditions until the temperature of the parquet and the room are equalized.
Installation plan
Before starting installation, it is necessary to create a graphic plan for laying parquet at a specific site. At this stage, the direction of laying (straight or diagonal) and the presence of additional elements are finally determined.
The axes and boundaries of the installation are drawn in the actual dimensions of the room.
A carefully worked out plan will allow you to accurately install, achieve the desired visual effect and optimize the consumption of materials.
Brief description of installation methods
- screed – glue – parquet
Three-layer parquet boards are recommended for installation directly on a screed with glue. Taking into account the high requirements for the installation geometry with the French herringbone pattern, it is necessary to ensure precise fixation of the planks before the glue cures (see installation procedure).
- screed – waterproofing – plywood – glue – staples – parquet
You can also install this parquet on plywood using glue and staples (screws), this will allow you to accurately and quickly fix the planks and ensure their reliable clamping until the glue hardens. The technology of installation on plywood is also suitable for installation on chipboard and plank bases.
Installation – SCREED – GLUE – PARQUET
Required Tool:
- Marking cord
- Guide rail 3 m, metal, 2 pcs.
- Stops for fixing the planks
- Elastic parquet hammer or mallet
- Block for tamping planks
- Crutch for tapping planks in hard-to-reach places
- Square or template (control of angles 45°, 90° and 135°)
- Spatula for applying parquet glue
Installation procedure
Prime the base prepared for installation of parquet. Continue working only after the primer has completely dried.
To achieve the best installation aesthetics, the planks are sorted by shade and texture before installation.
The direction of laying is tenon forward.
Installation of the “French Christmas tree” begins with laying the lighthouse row. A lighthouse row, in the case of a simple rectangular room, is a row of planks laid to the right of the longitudinal median line (axis) of the room. It is the base for the entire installation. An example of the layout of a simple rectangular room is shown inFig. 1.
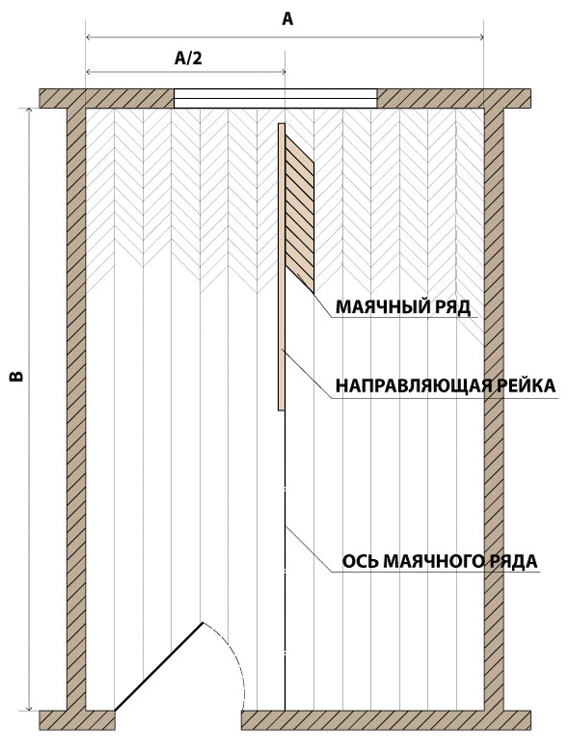
Fig. 1
Determine the axis of the lighthouse row. Draw a center line on the base according to the installation plan. To apply markings, use a marking cord. Accurately install the guide rail along the axis of the lighthouse row so that the installation is carried out to the right of it.The rail must be secured with dowels to prevent it from shifting when installing the slats. Assemble the three planks and install them with the left edges pressed against the batten and the right edges aligned in a line. The planks must be connected without gaps, the joining of the edges is checked with a lath.
Using a protractor or template, we check the angle of 135°. We install a stop to prevent the slats from shifting during installation. The stop is installed in such a way that the compensation gap to the wall is maintained. The size of the gaps is calculated based on the size of the room in the direction of the gap, 1.5 mm for each meter, but the size of the gap should not be less than 8 mm.
We apply installation marks on the rail and stop. This stage is shown inFig. 2
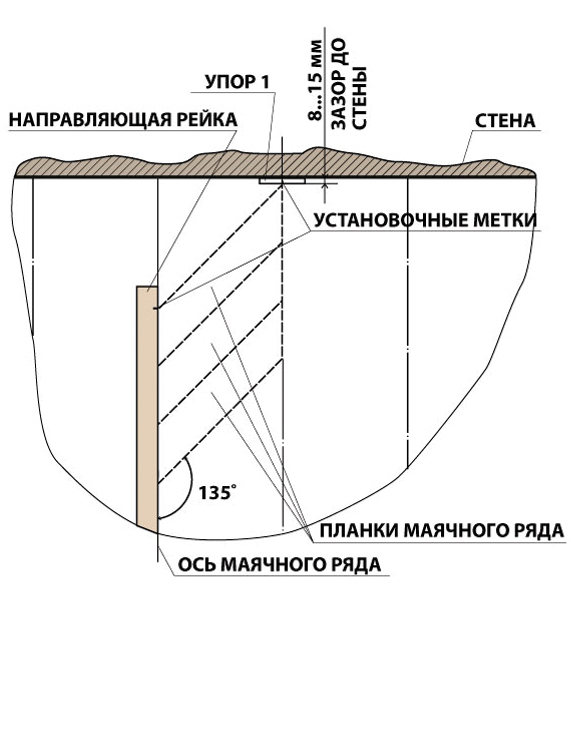
Fig. 2
We lay the lighthouse row on glue
To do this, apply parquet glue to the area where 3-4 planks are laid. When applying glue, make sure that the glue does not get on the rail or beyond the center line. If this happens by chance, remove the excess with a rag. We install the strips sequentially. We check that there are no gaps between the planks. After every meter of laying, we check that the right laying line is maintained, using the second strip. The laying line must be smooth and coincide with the markings along the corner. Gaps with the strip should not exceed 0.2 mm. The operation is repeated until the row is completed. If necessary, the guide rail is expanded with an additional rail. We finish laying the lighthouse row on the last intact plank.
Attention! The correct placement of the beacon row will affect the accuracy of the entire pattern.
After the beacon row is installed and fixed with glue, laying continues to the right of it. For the first plank of the next row, you need to install stop 2 (Fig. 3). It is based in a similar way, using three right-hand slats assembled without glue, with control of the angle of 45°.
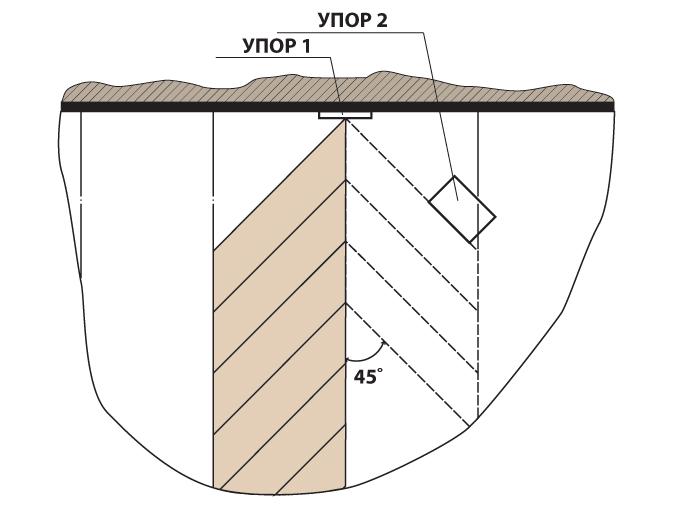
Fig. 3
Installation of the second row on glue is carried out using the technology described in the installation of the beacon row. Control of installation accuracy is similar.
Repeating the steps for installing rows to the right and left of the lighthouse row, we install parquet throughout the entire room. When installing the outer rows, trimming of the slats may be necessary. It is made taking into account the compensation gap (see above).
We install parquet in the remaining unfilled triangles. Moreover, the residues formed when cutting the planks on one side are suitable for installation on the other side (Fig. 4). For planks in hard-to-reach places, we use a tamping spike.
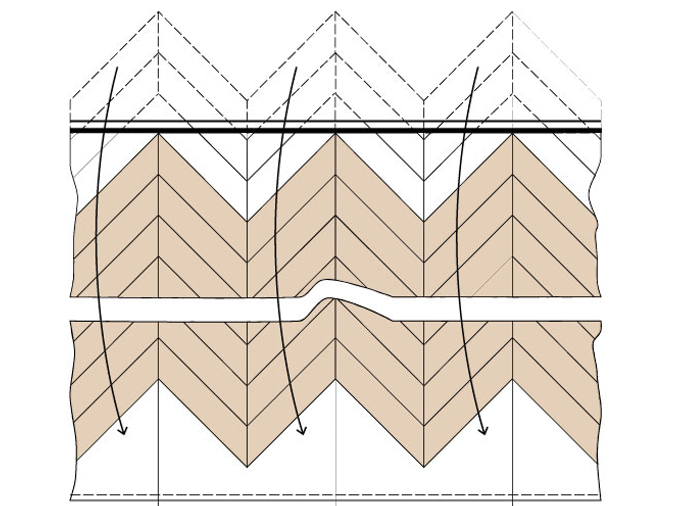
Fig. 4
Installation – WATERPROOFING – PLYWOOD – GLUE – STAPLES – PARQUET
The technology of installation on plywood using staples or self-tapping screws differs only in that the planks are fixed immediately, and there is no need for an additional stop 2.
After installation
After installing the parquet floor, the perimeter of the room is decorated with baseboards and moldings. The baseboards and moldings are attached to fixed elements so as not to hinder temperature and humidity fluctuations in the size of the parquet flooring.
After installing the parquet and moldings, clean the parquet using a vacuum cleaner and Coswick cleaning product. To remove heavy soiling from the front surface of parquet, use Coswick Intensive Cleaner. Before installing furniture, but not before the adhesive has completely cured, attach protective pads to its legs.
If necessary, cover the parquet with protective material. To cover parquet for a long period, use only breathable material (for example: batting, corrugated cardboard, cardboard, canvas, etc.).
ATTENTION: do not cover parquet when the floor heating system is running or when the heating pipes running in the floor are insufficiently insulated.