Installation Herringbone T&G
Before installation
Installation of a three-layer parquet board is carried out using a simple and reliable technology for installing piece parquet on a plywood base using parquet glue, mechanical fixation, mixed.
Three-layer parquet boards are designed for installation in all types of residential premises at, above or below ground level. This type of installation is not suitable for heated floors.
This installation method allows you to:
- use an insufficiently strong subfloor base to install parquet;
- compensate for unevenness of the base and leveling, as well as the use of additional hydro- and sound-proofing layers (floating method of laying plywood);
- Fixing parquet planks on a plywood base with staples ensures their immobility until the glue dries completely.
Preparation of concrete screed:
- The constant humidity of the base should not exceed 4%. If the moisture level exceeds this value, installation should be delayed until the source of the moisture is found and eliminated. Turn on heating devices and ensure good ventilation in the room. If moisture is indoors, use a dehumidifier or air conditioner. If you don’t have a moisture meter, you can attach a 1m x 1m sheet of polyethylene film to the screed using tape. If after 2 days no condensation has formed on the inside of the film, then the screed is dry and the parquet floor can be installed.
- The surface of the concrete-cement screed must be free of defects (cracks, potholes) and absolutely flat. Deviations in height should not exceed 2mm for every 2m of screed surface. In case of minor differences in level, leveling can be done using putty mass. In case of significant differences, it is recommended to level the entire surface with a self-leveling device. Leveling materials must have good adhesion to the base. The compressive strength of leveling materials must also be at least 15N/mm2. Before starting work, completely clean the subfloor using a brush or vacuum cleaner.
| Main controlled parameters | |
| Room humidity, % | W=40-65% |
| Base humidity, % | No more than 4% |
| Room temperature, °C | T=18-22 °C |
| Base unevenness, mm | No more than 2 mm x 2 m.p. |
After all the preparatory work has been completed and the necessary repairs of identified violations have been carried out, the monitored parameters are re-measured; if the indicators do not exceed the permissible values and all requirements for the base are met, installation of the coating can begin.
Before starting work:
- Parquet is installed as a last resort, after completion of all construction and finishing work associated with an increased degree of pollution and humidity.
- Before starting work, it is necessary to check and start (for at least two weeks) all microclimate systems.
- Bring the sealed boxes of hardwood flooring into the room where the flooring will be installed and leave it in a horizontal position for four to five days. Do not open boxes before starting work. Parquet needs to adapt to the temperature and humidity of the room.
Floor preparation:
Laying the film (if necessary):
- Laying the film is necessary to protect the parquet from possible moisture penetration (suitable for the option with a floating base; for the option with rigid plywood fastening, a different method of waterproofing is required).
- The film is laid over the entire area of the base, overlapping along the base of all walls (up to 5 cm in height, excess film will be trimmed after completion of the work.), the joints are taped.
Laying and fastening plywood.
- The humidity of the plywood base should be no more than 12%
- When laying, plywood sheets must be oriented in a way that prevents parallelism between the joints of plywood sheets and parquet planks.
- Floating method. Sheets of plywood with a square side of 500…750mm, 9mm thick, are laid in two layers:
- Based on the direction of laying the parquet, the angle of laying the plywood elements for each layer is selected: each layer is turned at an angle of 45˚ to prevent the joints from overlapping each other;
- the first layer is laid directly on the base with a distance from the walls of 8…10mm without fastening to the base and at a distance of 2…3mm from each other along the perimeter (the plywood sheets should not touch);
- the second layer of plywood is laid at an angle of 45˚, also with a distance from the wall of 8…10mm and at a distance of 2…3mm from each other along the perimeter;
- fastening of plywood sheets to each other is carried out using a pin pneumatic gun using pins no less than 15 mm long, knocking is carried out along the perimeter of the plywood sheet at intervals of 100 mm from each other and diagonally.
- Fastening plywood to dowels. Sheets of plywood with a square side of 500…750mm (with a thickness not less than the thickness of parquet) are laid in one layer:
- plywood is laid directly on the base with a distance from the walls of 8…10mm and at a distance of 2…3mm from each other along the perimeter (plywood sheets should not touch);
- The plywood sheets are pre-fastened using screws and dowels. The plywood attachment points should allow the plywood to “breathe” in a horizontal plane. Fasteners are placed around the perimeter in increments of 100-200mm and diagonally.
- Fastening plywood with glue. Sheets of plywood measuring 300x300mm (with a thickness no less than the thickness of parquet) are laid in one layer:
- To install plywood, it is recommended to use either silane-modified polyurethane adhesive Coswick SPU 303 (possible without primer, as described above) or two-component polyurethane Coswick 2K PU 205 with universal primer Coswick F00 Prime.
- plywood is laid on the base with a distance from the walls of 8…10mm and at a distance of 2…3mm from each other along the perimeter (plywood sheets should not touch);
- After installing the plywood, the base is carefully removed.
Laying
Marking:
- Packages of herringbone parquet contain 50% left-ridged planks and 50% right-combed planks.
- Before installation, sort the slats into left-handed and right-handed. Sort the planks by color tone and texture, which helps create a more uniform and balanced floor.
- Set aside planks with minor flaws – they can be used for trimming or installation under furniture. Decide which parquet planks will match the texture and color of the transitions and moldings, and set them aside.
- As a centerline, pull the cord parallel to the supporting wall, according to the installation plan.
Parquet boards, like other natural materials, tend to shrink and expand depending on the microclimate in the room. To prevent deformation of the parquet, along the perimeter of the room it is necessary to create a mandatory technological expansion gap of 8…10 mm between the floor and walls, door thresholds, door blocks and stairs. In rooms whose width exceeds 10 m in the laying direction, additional expansion joints are created.
Installation of three-layer parquet boards:
Application of glue:
- When using, the glue should be at room temperature.
- The glue must be thoroughly mixed at the bottom and along the edges of the jar.
- The glue must be applied using a special notched trowel in an even layer on the base. To install parquet boards on a plywood base, it is recommended to use B5-B spatulas
- To apply the adhesive evenly, hold the spatula at a 90-degree angle to the floor.
- The glue is applied 15-20mm wider than the material being laid.
- Apply glue to the base with a total width of 2-3 strips. Installation of the planks must be completed before the film formation time specified in the instructions for use of the adhesive has expired.
- When applying adhesive, be careful not to get any adhesive on the rail or beyond the centerline. If this happens by accident, remove the excess with a rag.
Installation:
- Attach a template to the base at an angle of 45 degrees to the center line and a stop that provides a compensation gap to the wall of 8…10mm.
- For convenience, the first 6-8 planks are preliminarily assembled “dry”, glue is applied to the place of their installation and, pressing the first starting plank of the left row tightly to the template, they begin to install the “beacon tree”. The lighthouse row must be laid so that the left row of planks is under the cord, and the corners of the planks of the right row only touch the line of the cord (Fig. 1).

Fig.1.
- The parquet strips of the lighthouse row are fastened by gluing with additional fixation (if necessary) using a pneumatic staple hammer using staples (the length of the staples should ensure reliable fixation of the parquet strip on the plywood), nailing is carried out after 20-25 cm and retreating 5-6 cm from the ends slats, nailed into the crest of the slats at an angle of 45 degrees.
- Each plank must be attached in at least two places.
- When installing a lighthouse row of parquet boards using the method of gluing to the base, ensure that the freshly laid parquet is pressed against the base, protecting the coating with soft fabrics (batting, backing).
ATTENTION! The correct installation of the beacon row will affect the accuracy of the installation of the entire pattern.
- Repeating the steps for installing the rows to the right and left of the lighthouse row, install parquet throughout the entire room. When installing the outer rows, trimming of the slats may be necessary. It is made taking into account the compensation gap.
- Install parquet in the remaining unfilled triangles. The remains formed when cutting the planks on one side can be used for installation on the other side (Fig. 4), and it is necessary to maintain a deformation gap of 8…10 mm to walls, partitions, steps. For planks in hard-to-reach places, use a tamping spike (Fig. 2).
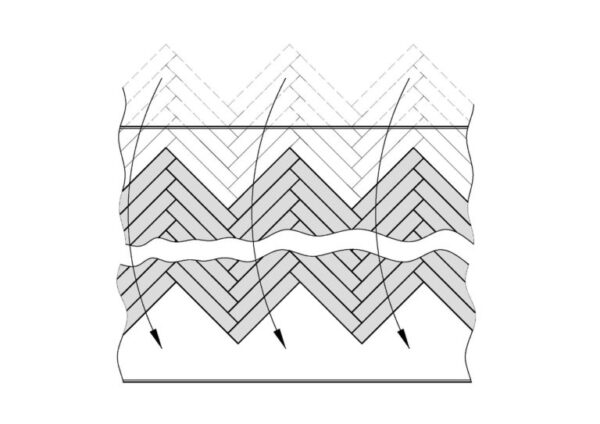
Fig.2
- In the places where the pipes exit for the batteries in the parquet strips, a hole is measured and drilled using a drill and a drill bit, with a diameter 10 mm larger than the diameter of the pipe;
NOTE: Due to the precision of the routing, it may be necessary to use a tamping block (or shim) to better connect the groove and tongue. Never use a rubber mallet or mallet to hit the hardwood floors directly as this may damage the floorboards.
After installation
- After installation is complete, remove dust and debris with a vacuum cleaner and treat the floor with Coswick cleaner.
- Limit indoor traffic and wait 24 hours before removing spacers (buffers) and installing baseboards and moldings. Be sure to remove spacers (buffers) 24 hours after installing the parquet board.
- Install the baseboard around the perimeter of the entire room. Attach the baseboard only to the wall, not to the parquet board.
- Before installing furniture, attach protective pads to its legs.
- Always keep a few strips in reserve for possible repairs of accidentally damaged strips.
Before installation
Installation of a three-layer parquet board is carried out using a simple and reliable technology for installing piece parquet directly on a concrete base using parquet glue.
Three-layer parquet boards are designed for installation in all types of residential premises at, above or below ground level. Before laying parquet boards on a heated floor, it is necessary to study the recommendations and restrictions for installing and operating parquet boards on this type of base.
Preparation of concrete screed:
- A three-layer parquet board can be installed on a concrete screed if its compressive strength is at least 15N/mm2 (when tested with a sclerometer). If the concrete strength is lower, there is a danger of the screed breaking at the adhesive joint when tension appears in the parquet flooring. The strength of concrete can be easily checked using an ordinary nail. If the concrete does not crumble when its surface is scratched with a nail, then the screed is strong enough.
- The constant humidity of the base should not exceed 4%. If the moisture level exceeds this value, installation should be delayed until the source of the moisture is found and eliminated. Turn on heating devices and ensure good ventilation in the room. If moisture is indoors, use a dehumidifier or air conditioner. If you don’t have a moisture meter, you can attach a 1m x 1m sheet of polyethylene film to the screed using tape. If after 2 days no condensation has formed on the inside of the film, then the screed is dry and the parquet floor can be installed.
- The surface of the concrete-cement screed must be free of defects (cracks, potholes) and absolutely flat. Deviations in height should not exceed 2mm for every 2m of screed surface. In case of minor differences in level, leveling can be done using putty mass. In case of significant differences, it is recommended to level the entire surface with a self-leveling device. Leveling materials must have good adhesion to the base. The compressive strength of leveling materials must also be at least 15N/mm2. Before starting work, completely clean the subfloor using a brush or vacuum cleaner.
After all the preparatory work has been completed and the necessary repairs of identified violations have been carried out, the monitored parameters are re-measured; if the indicators do not exceed the permissible values and all requirements for the base are met, installation of the coating can begin.
| Main controlled parameters | |
| Indoor humidity, % | W=40-65% |
| Base humidity, % | No more than 4% |
| Room temperature, °C | T=18-22 °C |
| Base unevenness, mm | No more than 2 mm x 2 m.p. |
Before starting work:
- Parquet is installed as a last resort, after completion of all construction and finishing work associated with an increased degree of pollution and humidity.
- Before starting work, it is necessary to check and start (for at least two weeks) all microclimate systems.
- Bring the sealed boxes of hardwood flooring into the room where the flooring will be installed and leave it in a horizontal position for four to five days. Do not open boxes before starting work. Parquet needs to adapt to the temperature and humidity of the room.
Preparing and priming the floor:
- The base must be dry, durable, free from dust, lime, oil, grease, old paint residues and other contaminants that can reduce adhesion to the base.
- To increase the strength of adhesion to the base, it must be primed. It is necessary to prime with a deep-impregnating strengthening primer.
- The prepared solution is applied to the prepared base using a brush, brush or roller (when priming horizontal surfaces, the formation of puddles must be avoided).
- Heavily dusty, hygroscopic substrates are primed twice.
- It is recommended to carry out further finishing work after the primed surface has completely dried (the time for complete drying of the primer is indicated in the instructions).
NOTE: When working with Coswick SPU 303 silane-modified polyurethane adhesive, a clean, dust-free substrate does not need to be primed and has excellent adhesion to cement-based and anhydrite-based screeds.
Coswick produces a full range of parquet adhesives and primers. To install a three-layer parquet board, it is recommended to use either silane-modified polyurethane adhesive Coswick SPU 303 (possibly without primer, as described above) or two-component polyurethane Coswick 2K PU 205 with universal primer Coswick F00 Prime.
Installation
Marking:
- Packages of herringbone parquet contain 50% left-ridged planks and 50% right-combed planks.
- Before gluing, sort the planks into left-handed and right-handed. Sort the planks by color tone and texture, which helps create a more uniform and balanced floor.
- Set aside planks with minor flaws – they can be used for trimming or installation under furniture. Decide which parquet planks will match the texture and color of the transitions and moldings, and set them aside.
- As a centerline, pull the cord parallel to the supporting wall, according to the installation plan.
Parquet boards, like other natural materials, tend to shrink and expand depending on the microclimate in the room. To prevent deformation of the parquet, along the perimeter of the room it is necessary to create a mandatory technological expansion gap of 8…10 mm between the floor and walls, door thresholds, door blocks and stairs. In rooms whose width exceeds 10 m in the laying direction, additional expansion joints are created.
Installation of three-layer parquet boards:
Application of glue:
- When using, the glue should be at room temperature.
- The glue must be thoroughly mixed at the bottom and along the edges of the jar.
- The glue must be applied using a special notched trowel in an even layer on the base. To install parquet boards on a concrete base, it is recommended to use a B11 spatula
- To apply the adhesive evenly, hold the spatula at a 90-degree angle to the floor.
- The glue is applied 15-20mm wider than the material being laid.
- Apply glue to the base with a total width of 2-3 strips. Installation of the planks must be completed before the film formation time specified in the instructions for use of the adhesive has expired.
- When applying adhesive, be careful not to get any adhesive on the rail or beyond the centerline. If this happens by accident, remove the excess with a rag.
Installation:
- Attach a template to the base at an angle of 45 degrees to the center line and a stop providing an 8…mm compensation gap to the wall.
- For convenience, the first 6-8 planks are preliminarily assembled “dry”, glue is applied to the place of their installation and, pressing the first starting plank of the left row tightly to the template, they begin to install the “beacon tree”. The lighthouse row must be laid so that the left row of planks is under the cord, and the corners of the planks of the right row only touch the line of the cord (Fig. 1).
Fig.1.
- When installing a lighthouse row of parquet boards using the method of gluing to the base, ensure that the freshly laid parquet is pressed against the base, protecting the coating with soft fabrics (batting, backing).
ATTENTION! The correct installation of the beacon row will affect the accuracy of the installation of the entire pattern.
- Repeating the steps for installing the rows to the right and left of the lighthouse row, install parquet throughout the entire room. When installing the outer rows, trimming of the slats may be necessary. It is made taking into account the compensation gap.
- Install parquet in the remaining unfilled triangles. The remains formed when cutting the planks on one side can be used for installation on the other side (Fig. 4), and it is necessary to maintain a deformation gap of 8…10 mm to walls, partitions, steps. For planks in hard-to-reach places, use a tamping spike (Fig. 2).
Fig.2
- In the places where the pipes exit for the batteries in the parquet strips, a hole is measured and drilled using a drill and a drill bit, with a diameter 10 mm larger than the diameter of the pipe;
NOTE: Due to the precision of the routing, it may be necessary to use a tamping block (or shim) to better connect the groove and tongue. Never use a rubber mallet or mallet to hit the hardwood floors directly as this may damage the floorboards.
After installation
- After installation is complete, remove dust and debris with a vacuum cleaner and treat the floor with Coswick cleaner.
- Limit indoor traffic and wait 24 hours before removing spacers (buffers) and installing baseboards and moldings. Be sure to remove spacers (buffers) 24 hours after installing the parquet board.
- Install the baseboard around the perimeter of the entire room. Attach the baseboard only to the wall, not to the parquet board.
- Before installing furniture, attach protective pads to its legs.
- Always keep a few strips in reserve for possible repairs of accidentally damaged strips.