INSTALLING SINGLE STRIP FLOORING COSLOC 5G
BEFORE INSTALLATION
NEW GENERATION LOCKING HARDWOOD FLOOR COSLOC 5G
Coswick engineered CosLoc 5G flooring (patent held by Valinge Innovation, Sweden) ensures easy, fast and glue-less hardwood installation and repair (so called ‘floating floors’).
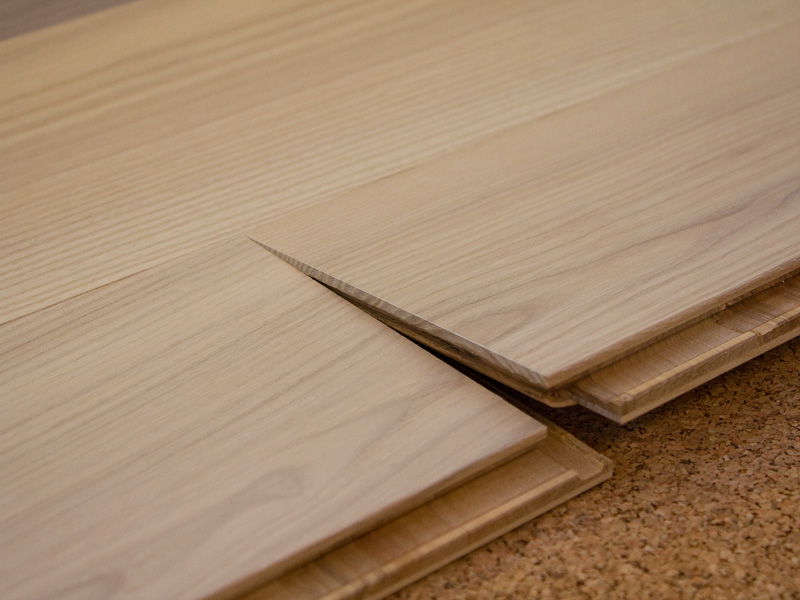
Joining of flooring planks is done by lowering the tongue of one plank into the groove of another, where they are linked by a plastic latch. When linkage is done correctly, the plastic latch ‘clicks’ the planks together.
Coswick 3-layer single strip flooring CosLoc 5G:
- Simplified installation technique- “one step installation”;
- Reduced amount of time required for installation;
- No need for highly qualified professional installers (installation of CosLoc 5G flooring is perfect for a DIY project);
- Planks fit together perfectly; an audible ‘click’ confirms that planks were connected properly.
- Installation of CosLoc 5G flooring can be done by a ‘floating’ method over an underlayment or by being glued down directly onto the subfloor or sound membrane.
PRODUCT USE:
Coswick 3-layer single strip CosLoc flooring can be used in all types of residential spaces, and installed above, on, or below ground level; it can be installed over radiant heat floors (* except Exotic species).
It is very important that you read and understand the information contained in this installation guide before starting, as improper installation can void the warranties.
INSTALLER/OWNER RESPONSIBILITY
It is the responsibility of the installer and/or the homeowner to inspect boards and all material for proper color, style, finish and quality prior to installation. Prior to installation, make sure that the flooring is the correct material, remove any boards/materials with which you are not satisfied. Coswick Hardwood accepts no responsibility for any costs incurred after planks with visible defects have been installed. Once installed, any plank is considered as having been accepted by both installer and owner, even if the owner was not present at the time of installation.
Keep in mind that wood is a natural product, so some color and grain variation is inevitable. Prominence of natural variation depends on the characteristics of the wood species. Coswick does not warrant against natural variations that occur from plank to plank or variations from sample to plank.
Use of filler, putty stick or stain in order to correct minor defects during installation should be accepted as normal procedure.
It is standard trade practice to allow for up to 5% margin as an allowance for cutting waste and grading variance. 5% cutting allowance must be added to the actual square footage amount.
WARRANTY
Lifetime Structural Warranty
Coswick Ltd warrants its products, in their original manufactured condition, to be free from defects in milling, drying and grading. Lifetime Structural Warranty means that the product will remain free from milling and grading defects for a lifetime in normal environmental conditions.
Finish Warranty
Coswick Ltd warrants to the original purchaser that when used under normal residential traffic conditions and maintained following Coswick Floor Maintenance Guide, factory applied CosNanoTech+ surface finish will not wear through or separate from the wood for a full twenty-five-year (25) period from the date of purchase.
Tools and Equipment
For successful installation of Coswick 3-layer single strip flooring CosLoc 5G, you will need the following tools and accessories:
- Mitre saw
- Hacksaw
- Vacuum cleaner and a broom
- Hardwood repair kit
- Coswick service kit
- Triangle
- Chalk line
- Measuring tape
- Finishing nails
- Wood moisture meter
- Plastic film 2mil
- Cork underlayment 2mm
- Spacers (buffers)
CAUTION: WOOD DUST
The International Agency for Research on Cancer has classified wood dust as a nasal carcinogen. The sawing, sanding, and/or machining of wood products can produce wood dust that can cause respiratory, eye and skin irritations. Wear an appropriate dust mask to reduce exposure to airborne wood dust. Avoid contact with eyes and skin. In case of irritation, flush eyes or skin with water for at least 15 minutes. In case of severe irritation, seek immediate medical attention.
Attention California Installers and Consumers: WARNING: Installation of this product may create wood dust, which is known to the State of California to cause cancer.
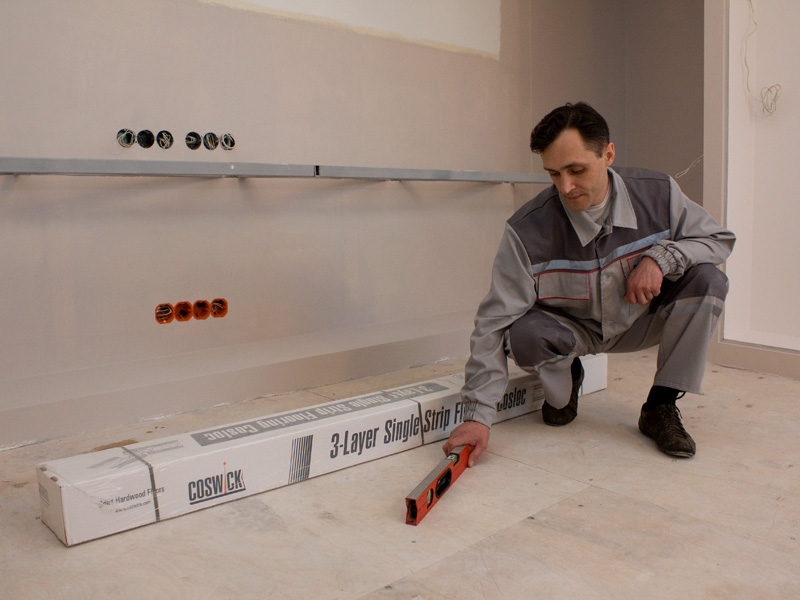
Subfloor Preparation
PRODUCT USE:
Coswick 3-layer single strip CosLoc flooring can be used in all types of residential spaces, and installed above, on, or below ground level; it can be installed over radiant heat floors (* except Exotic species).
PRE-INSTALLATION CHECKLIST
Before you begin installation, make sure that that following pre-installation requirements are met:
- 2mil polyethylene is not required when installing over vinyl, wood, OSB or plywood subfloor.
- 2mil polyethylene is required when installing over concrete subfloor (on or below grade).
- It is not recommended to install CosLoc 5G flooring over carpet.
- It is not recommended to install CosLoc 5G flooring over wood flooring glued to concrete subfloor.
- Leave ½” expansion space at all vertical surfaces.
- In order to avoid damage, hardwood flooring should be the last item installed during construction or renovation.
- Prior to installation, heating and air conditioning systems must be in operation, and room temperature must have been maintained at 18-22C (64-71F) for at least one week.
- Relative humidity on the job site should be 45-60% at all times.
- To avoid moisture-related damages, make sure that the subfloor is dry and that the basement is well ventilated. Moisture level of wood subfloor must not exceed 12% and differential between wood planks and subfloor must be less than 4%.
- Keep sealed boxes in room where flooring will be installed for at least 24 hours before installation. Do not open cartons until ready to install.
- Due to natural wood properties, flooring from Jatoba (Brazilian Cherry), Cumaru (Brazilian Teak), Santos Mahogany and American Walnut must not be installed over radiant heat systems.
RECOMMENDED SUBFLOOR SURFACES
Concrete Subfloor Guidelines and Preparation
- You can install engineered flooring over concrete subfloor if the compressive strength of concrete is at least 20N/mm2. If the strength of concrete is lower, there is a risk of damage to the subfloor in the areas of glue seams, should any tension appear in the floor boards. It is easy to test the strength of concrete using a simple nail. If no crumbling occurs when the surface of concrete is scratched with a nail, the subfloor is strong enough to have hardwood installed over it.
- Humidity level of the concrete subfloor should be between 0.2-4%. If humidity level is higher, installation needs to be postponed until the source of moisture is located and removed. Turn on heaters and ensure proper ventilation to speed up the process. If the source of increased humidity is indoors, use an air dryer or AC.
- Moisture level of subfloor must not exceed 14% and differential between wood planks and subfloor must be less than 4%. If humidity meter is not available, humidity level can measured using the following method: attach a 1x1m piece of plastic film to the surface of the concrete subfloor with tape. If no condensate has formed on the inner side of the film two days later, then the subfloor is dry enough for hardwood to be installed.
- Moisture content for concrete subfloors registered after a calcium chloride test should not be greater than 7 pounds per 1,000 square feet of area in 24 hours. If it exceeds these limits, do not install the flooring. Before beginning moisture testing, concrete must be cured for a minimum of 30 days.
- Concrete subfloor surface must be absolutely flat. Any deviations from the floor level must not exceed 2mm for every 2m of subfloor surface. Minor level fluctuations can be corrected using dispersion primer. If level fluctuations are significant, it is recommended to level the surface with a self-levelling floor compound. Before starting installation, clean the subfloor surface using a broom or a vacuum cleaner.
Note: It is the sole and joint responsibility of owner and installer to conduct pre-installation subfloor moisture checks and ensure that all conditions and specifications listed in this installation guide have been met prior to starting installation.
WOOD, PLYWOOD, OSB SUBFLOOR GUIDELINES AND PREPARATION
- It is recommended to use plywood or OSB for a subfloor. It is NOT recommended to use particleboard. Staple down installation requires minimum 5/8” plywood or ¾” approved OSB subfloor.
- Moisture level in wooden subfloor must not exceed 12%. Differential between flooring boards and subfloor must be less than 4%. If moisture level in subfloor is higher, installation has to be postponed until the source of moisture is located and removed. Turn on heaters and ensure proper room ventilation. If the source of moisture is indoors, use an air-dryer or AC. If moisture level of the subfloor is less than 4%, use an air humidifier.
- To avoid squeaking in your floors, make sure that there is no movement in the subfloor. If needed, use flooring screws to fix movement. Surface of subfloor must be absolutely flat. If necessary, flatten subfloor using a sander. Before beginning installation, clean your subfloor using a vacuum cleaner and a broom.
Note: It is the sole and joint responsibility of owner and installer to conduct pre-installation subfloor moisture checks and ensure that all conditions and specifications listed in this installation guide have been met prior to starting installation.
SUBFLOOR PREPARATION CHECKLIST
- It is the responsibility of the owner/installer to ensure that the conditions of the subfloor and jobsite are structurally acceptable prior to the installation of hardwood flooring. Coswick accepts no responsibility for deficiencies of hardwood flooring that result or are related to subfloor, sub-surface or environmental conditions on the jobsite.
- Subfloor must be clean, flat, dry and structurally sound.
- Subfloor must be clean and free of any dirt, curing compounds, sealers, drywall mud, wax, urethane, grease or any other material that may affect the integrity of flooring itself or adhesives used to install it.
- All subfloors and subfloor systems must be structurally sound and must be installed following their manufacturer’s recommendations.
- Subfloor must be thoroughly vacuumed and free from any debris, such as cleats, nail heads, dried glue or any other material.
PRE-INSTALLATION CHECKLIST
- Leave the boards in their original packaging until ready for use.
- Inspect all flooring material for color, finish, milling and grade, removing unacceptable planks.
NOTE: Coswick does not accept responsibility over any costs incurred when planks with visible defects have been installed.
- To achieve a uniform appearance across the entire floor, work from several cartons at a time. Prior to installation, “dry-lay” the flooring, mixing planks from several cartons. Ensure that the color is consistent and remove any planks with visual defects.
- Open a few boxes of hardwood flooring and arrange boards in the way you plan to install them. Boards with minor flaws can be used for trimming. Select boards, the color and texture of which match transition moldings and carpet reducers, and put them aside.
- Planks in the last row must be at least 1-1/2” (38mm) wide in order to be attached properly. If the last row is to be less than 1-1/2”, reduce the width of the first row so that both the first and last rows meet this requirement.
Floating Method
Coswick 3-layer single strip flooring CosLoc 5G can be floated over subfloor only if the subfloor is flat, dry and has adequate compressive strength (refer to SUBFLOOR REQUIREMENTS for clarification), and if sound absorption and noise insulation requirements are not high.
Getting started:
- Using a chalk line, trace a guideline that is parallel to the starting wall. Leave a 1/2” expansion gap between the guideline and the starting wall. Leave a 1/3” expansion gap between the beginning and end of flooring rows and perpendicular walls. The expansion gaps will be covered by baseboards later.
- Cover concrete subfloor with 2mm polyethylene plastic sheeting. Seal seams with clear plastic tape. Allow polyethylene to run 2” up the wall, trim excess after installation is complete.
- Install underlayment: cover all of the subfloor as well as the base of the walls (approx. 2”) with membrane of choice (note: consult membrane manufacturer’s installation instructions for more information).
- Place spacers (buffers) along each wall in order to maintain necessary expansion gaps between flooring and the wall.
- Secure a straight edge (starter board) inside the chalk line to act as a guide and to prevent the row of planks from shifting during installation. A piece of lumber or flooring can be used as straight edge and it to be replaced after installation is completed.
- When using floating method of installation, no part of CosLoc 5G flooring is to be attached to any surface. Expansion gaps of 1/2″ must be left around all room fixtures.
Installation:
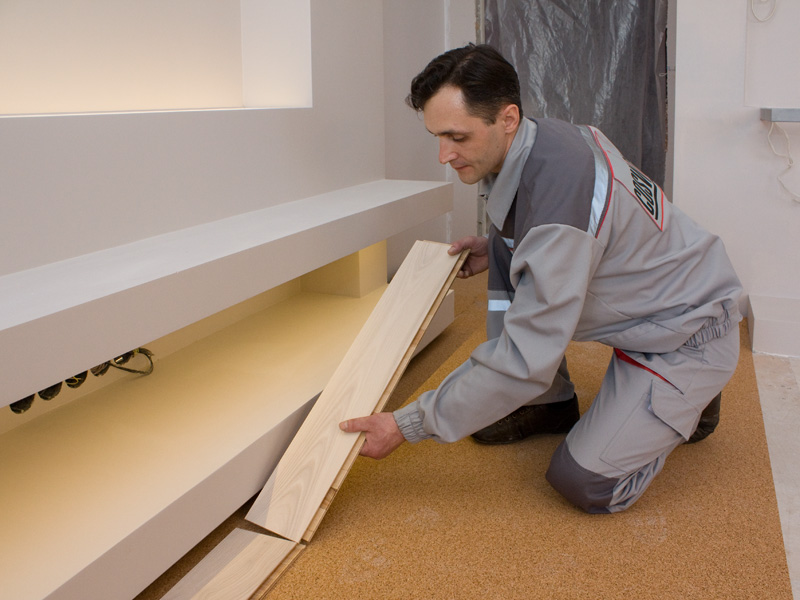
- Install the first board along the guideline, moving left to right, tongue site of the plank facing the wall. Fitting of planks is done by lowering the tongue of one plank into the locking groove of another. When installing the second row, angle the flooring plank and insert the tongue into the locking groove of the first row plank, pushing and lowering it at the same time. A characteristic audible clicking noise will confirm that the planks were linked correctly.
- Having installed the first three rows of hardwood strips, correct board alignment and regulate the width of expansion gaps if necessary.
- The last board in every row will need to be cut; use the remainder as the first board in the next row. Leave at least 2” for the last board of each row.
- Always alternate the lengths of boards so that transverse seams are positioned in a random manner, but no less than 15” apart. This will help avoid repetitive pattern effect.
- When installing the last row, cut the board lengthwise in a way that ensures an expansion gap of 1/2”.
- Remove the straight edge (starter row) and install last row using pry bar to pull plank into place if necessary.
- When installing the last row, apply glue to the groove and insert the last board.
Note: Never strike a rubber mallet or hammer directly on the flooring to fit the planks, as this can damage the flooring.
Post-installation:
- Restrict heavy foot traffic and wait 24 hours before removing spacers (buffers) and installing baseboards and mouldings.
- Install baseboards along the perimeter of the room. If needed, install transition moldings, stair nosings and reducers.
- Nail baseboards to the wall, but not to the floor. Baseboards may be nailed through the membrane.
- Cut membrane and polyethylene that go beyond the mouldings.
- After installation is finished, thoroughly vacuum the floor and clean it with COSWICK hardwood floor cleaner.
- Place felt pads under all furniture legs prior to bringing furniture into the room.
- Make sure to set aside a few flooring planks for future repairs.
- If necessary, put a protective cover over the hardwood flooring. To cover hardwood flooring over a long period of time use only breathable materials (e.g. batting, corrugated cardboard, cardboard, quilted fabric, etc.).DO NOT cover hardwood flooring with the underfloor heating system operational or without proper insulation of heating pipes situated in the floors.
Gluedown Method
Coswick 3-layer single strip flooring CosLoc 5G can be glued down directly onto the subfloor only if the subfloor is flat, dry and has adequate compressive strength (refer to SUBLOOR REQUIREMENTS for clarification). Installation over sound membrane ensures very high sound and noise absorption. This type of installation can be done if there is no risk of moisture damage to hardwood from the subfloor.
Additional tools and equipment:
- Recommended adhesive and adhesive remover (Bostik Best, Bostik BST, Franklin 811 Advantage, Franklin 531 Moisture Control, or any 100% Urethane Adhesive)
- Urethane adhesive remover
- Sound membrane (Coswick recommends using cork sound membrane)
- Trowel (use type recommended by adhesive manufacturer)
- Rag
- Levelling compound
- 100-180 lb roller
- 2” concrete nails and holding block
- Spacers (buffers)
Getting started:
-
- Using a chalk line, trace a guideline that is parallel to the starting wall. Leave a 1/2” expansion gap between the guideline and the starting wall. Leave a 1/3” expansion gap between the beginning and end of flooring rows and perpendicular walls. The expansion gaps will later be covered by the baseboard.
- Cover concrete subfloor with 2mm polyethylene plastic sheeting. Seal seams with clear plastic tape. Allow polyethylene to run 2” up the wall, trim excess after installation is complete.
- Install sound membrane: cover all of the subfloor as well as the base of the walls (approx. 2”) with membrane of choice (note: consult membrane manufacturer’s installation instructions for more information. Coswick recommends using cork sound membrane).
- Place spacers (buffers) along each wall in order to maintain necessary expansion gaps between flooring and the wall.
- Secure a straight edge (starter board) inside the chalk line to act as a guide and to prevent planks from shifting during installation. A piece of lumber or flooring can be used as straight edge and will be replaced after installation is completed.
Applying the adhesive:
-
-
- To ensure that adhesive is spread properly, hold the work trowel at a 45 degree angle.
- Only apply adhesive to surfaces that can be reasonably laid in 2 hours, since adhesive may dry up and thus will not stick properly. Room temperature and relative humidity variations may slow down or speed up drying time.
-
Note: refer to recommendations by adhesive manufacturer for information about proper trowels, spread rates, drying time and application specifications.
Installation:
-
-
- Spread adhesive to width of 2 planks and install the first board along the guideline, moving from left to right, tongue site of the plank facing the wall. Having installed the first three rows of hardwood strips, correct board alignment and regulate the width of the expansion gap if necessary. Once you are sure that the starter rows are straight, spread adhesive 2-3 feet wide.
- Proceed installing all subsequent rows by lowering the tongue of one plank into the locking groove of another. When installing the second row, angle the flooring plank and insert the tongue into the locking groove of the first row plank, pushing and lowering it at the same time, pressing into the adhesive. A characteristic audible clicking noise will confirm that the planks were linked correctly. Having installed the first three rows of hardwood strips, correct board alignment and regulate the width of expansion gaps and readjust the buffers if necessary.
- Always alternate the lengths of boards so that transverse seams are positioned in a random manner, but no less than 15” apart. This will help avoid repetitive pattern effect.
- The last board in every row will need to be cut; use the remainder as the first board in the next row. Leave at least 2” for the last board of each row.
- When installing the last row, cut the board in the way that allows an expansion gap of 1/2”.
-
Note: Never strike a rubber mallet or hammer directly on the flooring to fit the planks, as this can damage the flooring
Post-installation:
-
-
- Restrict heavy foot traffic and wait 24 hours before removing spacers (buffers) and installing baseboards and mouldings.
- Install baseboards along the perimeter of the room. If needed, install transition moldings, stair nosings and reducers.
- Nail baseboards to the wall, but not to the floor. Baseboards may be nailed through the membrane.
- Cut membrane and polyethylene that go beyond the mouldings.
- After installation is finished, thoroughly vacuum the floor and clean it with COSWICK hardwood floor cleaner.
- Place felt pads under all furniture legs prior to bringing furniture into the room.
- Make sure to set aside a few flooring planks for future repairs.
- If necessary, put a protective cover over the hardwood flooring. To cover hardwood flooring over a long period of time use only breathable materials (e.g. batting, corrugated cardboard, cardboard, quilted fabric, etc.).DO NOT cover hardwood flooring with the underfloor heating system operational or without proper insulation of heating pipes situated in the floors.
-
ENJOY YOUR COSWICK FLOORS!